Wednesday, August 31, 2011

National Arts in Education Week

We’re excited about a special event coming up sponsored by the National Art Education Association and we want to make sure you’re ready. September 11th through the 17th is National Arts in Education Week – a great time to celebrate art programming in the curriculum of our schools.
As a long-time artist-in-residence at schools across Kansas City, I’ve been amazed at the wonderful ideas and creativity our art teachers bring to the classroom. I enjoy seeing the projects their kids create and the inspiration these teachers provide. Plus, I love being part of a community of like-minded individuals who want to be sure our kids are developing an appreciation for art and the creative process.
To celebrate National Arts in Education Week, we’ll be sharing curriculum ideas for kid-tested oogly projects that work in the classroom. We’ll also be sharing art project ideas from other bloggers and art teachers near and far.
If you have an art project you know kids love and you’d like to share it with our readers during National Arts in Education Week, please leave us a comment or email us at info@ooglykit.com

Tuesday, August 30, 2011

Art Therapy, Kids and oogly

Oogly and the process of making an oogly has been a great tool for art therapists for many years. As I have worked with kids in hospitals, counseling workshops or in my studio, I have found that often kids respond to clay as a method of expression of their feelings, hopes and fears. 
I think kids find artistic forms of expression easy to master because they are still in touch with their creativity as described in the article from Creativity Queen, Why Children Use Art Naturally in Child Therapy.
I was very impressed to read this article on OregonLive.com about Lydia, a girl scout in Oregon who is earning her Gold Award, the highest Girl Scout honor, by educating her community about art therapy and providing workshops for grieving children to explore art therapy together. She was exposed to art therapy when she was dealing with the deaths of a friend and her brother and can speak to how art helped her heal.
I have seen the same results working with children who are dealing with grief or difficult family situations. Making an oogly becomes a process to explore their feelings and many times, becomes a way to articulate those emotions. In fact, many counselors use the oogly Kit and the oogly Feeling Cards as an art therapy method with children in their practice. Since no one knows what an oogly is, kids can feel safe and successful in whatever they decide to express as they create their piece. Plus, it’s a fun activity that can be repeated over time to see how feelings evolve.
For more information on how to use oogly and the oogly kit in art therapy settings, check out our website.  Are you using oogly in your practice now? We’d love to hear from you!

Monday, August 29, 2011

Single-fire Glazes for Kids' Clay Projects

Last week, we shared our thoughts on using different colors of stoneware clay to add contrast and color to kid’s clay projects. In that article, we mentioned that glazing can sometimes be a challenge when you are working with kids and clay because it usually requires two firings which means kids won’t get their project back quickly. In addition to contrasting stoneware clay colors, another solution that you may want to try is single-fire glazes.
In an informative blog by the folks at Electric Cone 6, Mid-Fire Potters (now there’s a specialized blog…), they point out that single-fire glazes have been used for a long time in industrial ceramics for tiles of all types, bricks and bathroom fixtures. So you can rest easy knowing this method is tried and true. Plus, it’s a great way to keep kids interested in their project from start to finish since all the work can be completed in a compact timeline.
Kids enjoy the process of painting their pieces and using single-fire glazes can be a teachable moment too as they discover how glazes are transformed at high temperatures. They will see that it’s not just the color that is altered, but also the finish, as the glazes transform from a chalky paint to a glistening luster on their pieces.
Have you tried single-fired glazes and what has worked for you? 

Thursday, August 25, 2011

A Box Turtle That's Really a Box

This fun turtle project has a hiding place right under it's shell. Try this easy clay project for kids who like boxes, turtles or any special, secret hiding place.

Materials
Clay (stoneware, terracotta or a non-hardening modeling clay will work)
*Slip (slurry made from old, dry clay and water to use as paste with stoneware or terracotta)
Peach seed for texture – gather peach seeds now while peaches are still in season!
Pencil

1. Divide a baseball-sized piece of clay into two parts.
2. Using one of the balls, make a shallow pinch pot for the body of your turtle.
3. Using the other ball of clay, pinch off pieces of clay for four legs. Each one should be slightly larger than a marble. Roll them into stubby one-inch coils. Apply texture to your turtle’s legs using the peach seed.
4. Attach one leg to each side of your turtle’s body – two front and two back legs.*
5.  Roll another small coil for the head and a smaller one for a tail and attach each to the body.*
6. Give your turtle eyes and a mouth using little pieces of clay or by drawing them on with a pencil. 
7. Use the remaining clay to make the shell of the turtle by making a pancake large enough to cover the pinch pot.  You can make some designs on it with your peach seed like I did and you can flair the edges of your turtle’s shell if you like.

If you are firing the turtle you can let the shell lay on the body.  Without glaze, it won’t to attach itself to the body when it is fired. But if you glaze the pieces, be sure they are not touching when they are fired.

*If you are working with stoneware or terracotta, you will need to use the slip as glue to attach the clay legs to your turtle. Using the pencil, make scratch marks on both surfaces you will be joining. Apply the slip to the piece of clay you are adding and press the piece into place.


We're sharing this project on Today's Creative Blog  and Skip to My Lou- check it all their fun projects.

Wednesday, August 24, 2011

Let Kids Experiment with Different Colors of Clay


Kids love color! It can sometime be a challenge when you are working with kids in clay because the usual grey or brown of clay isn’t as exciting as the colors in modeling clay or play dough.  One option is to glaze the pieces but that generally requires two firing and a big delay between the creation of a piece and completion. In between, kids can lose interest and enthusiasm.
One solution I have found to create the fun of colors with clay is to offer kids a variety of clay. Different types of clay come in different colors and as you can see from the ooglys in these pictures, the contrast of the reds, browns and greys create just the kind of visual interest kids are seeking.
Plus, by using clays that all fire to the same tempertures in a single firing, kids get their pieces back quickly without having to wait through multiple firing. Students can see the contrast in their pieces as they make them so for the most part, what they see is what they get after it’s fired. That can also reduce the disappointment factor that can happen when glazes don’t produce the colors kids expect.
As you can see here – you don’t have to have red, yellow and blue to create colorful clay projects for kids!

Tuesday, August 23, 2011

How easy is making an oogly?


I smiled when I read this article about How You Can Encourage Your Child To be Creative Even When YOU Are Not by Kelly Russell from Wisdom Begun posted as a guest blog at Not Just Cute. It has some great suggestions about how to encourage creativity in your kids’ lives when you aren’t particularly creative. It also had great reminders of how to spark imagination when you aren’t really in the mood for arts, crafts or anything remotely right-brained.
Are you sometimes at a loss when it comes to art projects for kids?
Well – I would add another suggestion to the list – have your kids make an oogly!

This weekend, a dear friend of mine got deserted by her “artistic” friend who had promised to play with her kids and help them with a clay project or two…But as luck would have it, oogly kits were close at hand as well as the video of how to make an oogly.

The boys are five and seven and neither had ever made an oogly. As luck and creativity would have it though, with a little instruction and a lot of imagination they were able to entertain themselves. Ooglys are that easy to make! This is the oogly that the five-year-old made with a kit and two viewings of the oogly video. Parental intervention and creativity need not attend.
Known as "Googly" to all his friends.
Of course, we highly recommend that adults make ooglys and it’s a great family activity. But on those days when you’re just not up for the challenge or your creativity is overwhelmed by the daily routine you might want to make sure your kids have everything they need to make an oogly. They’ll be entertained and you will too.

Monday, August 22, 2011

Colorful Caterpillars Made of Clay

Kids in our clay classes have enjoyed making all sorts of bugs this summer. Here’s one last easy clay project with our creepy, crawly friends in mind. Make a multi-colored caterpillar to go with the butterfly project we shared earlier this summer.

Materials
Three colors of clay (stoneware, terracotta or a non-hardening modeling clay will work)
Two one-inch pieces of wire

1. Choose one color to be your body of the caterpillar. Pinch off clay about the size of a ping pong ball and roll into a carrot, seven inches long and a little less than an inch thick. 
2. Squash the larger end a little to form a head.
3. Using each of the other clays, pinch off three marble-sized pieces of clay and roll them into inch-long coils and flatten each one.
3. Attach one flattened coil at a time, wrapping it around the body of your caterpillar. Each small coil will only wrap about halfway around the body. Blend the clay so it adheres well to the base.
4. Continue with remaining coils, alternating colors as you go. Be sure to overlap the coils just enough to cover the area where you blended the previous coil into the body of your caterpillar.
5. Finish by adding the last coil using the color that is the same as the body of your caterpillar.
5. Add two eyes using small balls of whichever color clay you prefer.
6. Make holes so you can add wire for antennae after your caterpillar is fired.

We're sharing this post today on Skip to My Lou where you'll find lots of other great projects like this. We're also sharing it on No Time for Flash Cards.

Thursday, August 18, 2011

Back to the Great Outdoors


Now that the temperatures have become reasonable again and your kids are sitting in classrooms all day, it’time to revisit some outside activities. Your children will appreciate time outdoors after a day at school and you’ll be glad they’re burning up some energy without the fear of heat stroke! Here are a few ideas I’ve found from my favorite blogs I think you’ll enjoy.

Although our oak trees may be a little lean on acorns this year because of the heat, this awesome nature- inspired mobile from Crafts by Amanda can be made with any found objects. I like projects like this one because you can send the youngsters out on a scavenger hunt before you even get down to the nuts and bolts of the project. So if you can’t find acorns for your mobile – get creative with other types of pods and seeds and share your creation with us.
Acorn Mobile from Crafts By Amanda
Childhood 101 features great ideas at Playopedia and this post of Outdoor Play Ideas is a great compilation of ideas from across the blogosphere. One of our favorites is Hosting a Fairy in Your Garden contributed by kitchen counter chronicles. Even though you may not be up for planting this time of year, you can still tuck an inviting fairy house into your garden someplace special for a little friend.
Fairy House from kitchen counter chronicles
If you are local to the Kansas City area, a couple of fun things this weekend include the second week of the Missouri State Fair in Sedalia. This write-up from Kristina Light at the KC Moms Blog gives too many great hints to summarize here so just follow the link.

Explore at Kansas City's Ethnic Enrichment Festival
Also this weekend, soak up some cultural and performing arts plus great food at Kansas City’s Ethnic Enrichment Festival. There won’t be any ooglys but there will be lots of music, food and things for kids to do. I’ll be helping friends at the Brazilian food booth on Saturday so stop by and say hi. I hope to see you there!

Wednesday, August 17, 2011

Fanciful Dragons Made By Students


A few weeks ago, I wrote about the value of letting kids create art that reflects their vision of the fantasy world. I’ve found that having children create the “unknown” from their imagination helps them conceptualize characters and places they’ve experienced only through their minds-eye.
Dragons are another fantasy creature that kids love to create. I always share a variety of images with the students in my classes but they don’t copy those things. In fact, because when we work with clay we are working in three dimensions, even the most graphic illustrations of something like a dragon fall short of the creations kids realize when they make a sculpture of their dragon.
I also find that dragons are popular with kids at a variety of ages. Their attention span may vary and influence the degree of detail they develop in their piece. But you can see from these pictures that even a small amount of detail results in a very individualized project.
So encourage kids to draw and build things beyond the realm of what they see and experience every day at home and in school. Let them create from their imaginations and explore their creativity. You’ll be amazed at the results and you might start to sees a little differently too.

Tuesday, August 16, 2011

Fish at a Birthday Party


Making fish from clay has been a great art project for kids this summer.  
Recently, a group of kids made fish with me at a birthday party. Playing with clay is such a fun way for kids to celebrate a special occasion.
Each girl made her own fish based on the easy instructions I provided. Then, we went ahead and painted the fish with glazes.
I fired them and the results were funny and cool. The fish are a rainbow of festive colors – just like the beautiful tropical fish at the fish store.  And with just one firing they are ready for the girls to take home and enjoy.

Monday, August 15, 2011

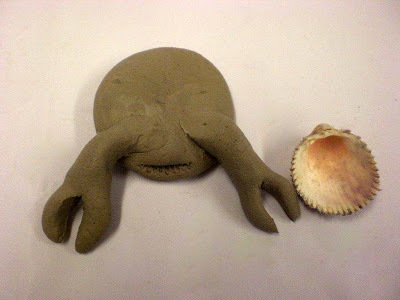
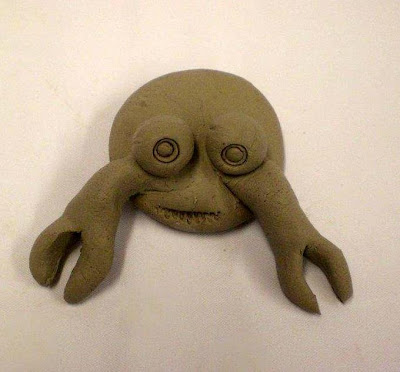
A Hermit Crab of Clay

Wondering what to do with the shells you picked up on the beach this summer? Use one to make the easy clay crab look even more life-like. You’ll have a fun memory of the beach and the creatures you may have seen on your visit to the water.
 
Materials
Clay (stoneware, terracotta or a non-hardening modeling clay will work)
*Slip (slurry made from old, dry clay and water to use as paste with stoneware or terracotta)
Any shell that would suit a hermit crab


1. Make a ball of clay the size of a ping pong ball and divide it into two pieces.
2. Roll one piece into a fat pancake. This will form the body of your crab.
3. Pinch a marble-sized piece of clay from the remaining clay and roll it into a two and a half inch coil.
4. Split one end of the coil and separate the end to form the crab’s claw. Attach the claw to the body of the crab.*
6. Repeat the process so your crab has two front claws.
7. For eyes, roll two balls of clay and attach them to the front of the crab’s body. Use the sharp edge of your shell to draw the mouth on your crab below the eyes.
8. For the remaining crab legs, make six one and a half inch coils and attached three to either side behind the front claws.
9. Now, add a real shell to the back of your crab. You can press it into the body so it sticks or just let it rest on the back of your crab.
*If you are working with stoneware or terracotta, you will need to use the slip as glue to attach the claws and legs to your crab. Using the pencil, make scratch marks on both surfaces you will be joining. Apply the slip to the piece of clay you are adding and press the piece into place.

We're sharing this post today on Skip to My Lou where you'll find lots of other great projects like this.

Thursday, August 11, 2011

Summer winding down

As summer draws to a close, I’m hoping that everyone had time to relax, unwind and enjoy some down time with their kids over the last few months. I worry, though, that perhaps the summers are getting just as hectic as the school year.

This article by Mitch Albom in Parade Magazine about kids and summertime struck a chord with me. I remember my summers on a farm when we didn’t have any activities scheduled. We helped with the hectic season of harvest and a bountiful vegetable garden but a lot of the time, my sisters and I were just kids playing together and hanging out.

My kids did a lot of the same as they were growing up. Summers were a different pace and so much time was just spent out in the yard playing with the neighbors. These days, it seems that everyone is on the go and there’s less of a change of pace. Kids and adults alike - we don’t get to slow down and change our rhythm.

What did you do this summer to make sure it felt like summertime for your kids? How do you help your kids enjoy the time away from school? Do you think they are getting the down time they need to just be kids? I’d love to hear your thoughts and opinions. 

Wednesday, August 10, 2011

Making Textures in Clay

I have worked with clay for thirty years, starting as a potter and then switching to sculpture a few years later. Clay is my passion for a number of reasons - I loved making mud pies as a kid and I still love the feel of clay in my hands. In particular, I love experimenting with texture in clay - to say is it impressionable would be an understatement.
Driftwood, a gourd, a pod and a cinnmon stick
I have found that experimenting with textures in clay is an activity that appeals to kids because they learn while they play and create. Understanding how a textured surface produces an imprint can be an ahh-ha moment for a child as they press found object. One experiment I enjoy is using the end of things, like markers, caps and even a cinnamon stick, to press texture into clay.

I started my experiments in textures from things I found in my father's workshop. He was a farmer and there were always interesting things I could find to press into clay on his workbench. I'm still inspired by those memories and I often visit hardware stores, especially old ones, to hunt for interesting objects.
A shell, a peach seed, coral and a produce bag
If you are looking for an easy clay project to let your kids experiment with textures, just create simple clay tiles, divide them into four squares and have kids press a group of objects onto the tile. You can make a theme, like seeds, leaves or shells. Or you can let it be more free-form and have them bring whatever they might find in the house, their toy box or the yard together to try.

The right texture can make trees with great looking bark and lots of attitude.
Then, you can talk about what the textures remind them of - the scales of a fish, the bark of a tree or the hair of a shaggy dog. I use texture to create all kinds of animals in my work and kids can be just as easily inspired. Give it a try!

Monday, August 8, 2011

Butterflies of Clay - An easy kid's project

The butterflies are floating through my garden this time of year. I’ve found making butterflies out of clay is an easy art project for kids and one they really enjoy. It’s also a fun project to experiment with textures and designs to mimic the colorful patterns of butterfly wings.

Materials
Clay (stoneware, terracotta or a non-hardening modeling clay will work)
*Slip (slurry made from old, dry clay and water to use as paste with stoneware or terracotta)
Buttons or other items to make imprints in clay – nut shells, seeds, bark or beads
Wire for the antennae

1. Make a ball of clay the size of a ping pong ball.  You probably not use all this clay.
2. Divide clay into two pieces.  To make the body of your butterfly, roll one ball into a 3-inch coil about the thickness of large magic marker. 
3. Divide the other piece of clay into four parts for the wings. You will use two pieces for each set of butterfly wings.
4. Flatten each piece into a shape that resembles half of a butterfly wing.  Usually, I make the front two pieces of the wings larger than the two pieces I use for the end of the wings.
5. Butterflies have so many different patterns you can add all sorts textures or decorations. I like to use seeds or pods for texture and add small balls or strips of different colored clay to decorate the wings.
6. Attach the wings to the body.*
7. You can add eyes to your butterfly using balls made of a different color clay.
8. Add antennas using wire. If you are planning to fire your piece, be sure to use high-fire wire or make holes before you fire your butterfly and add the wires later.

*If you are working with stoneware or terracotta, you will need to use the slip as glue to attach the wings to your butterfly. Using the pencil, make scratch marks on both surfaces you will be joining. Apply the slip to the piece of clay you are adding and press the piece into place.

We're sharing this post today on Skip to My Lou where you'll find lots of other great projects like this.