Witches are one of my favorite Halloween projects. I love the way clay lets me make fun features and crazy poses. I’ll share some of my witches in the blog soon but today, here’s an easy kid’s project you can do for Halloween. Use your imagination to add scary details to your witchy hat.

Materials
Clay (stoneware, terracotta or a non-hardening modeling clay will work)
*Slip (slurry made from old, dry clay and water to use a paste with stoneware or terracotta)
Pencil
Marker cap or other texture for adding details
Dull knife for cutting shapes from the clay
1. Start making the hat by forming a ball of clay the size of an orange. Roll the ball out into a pancake. The clay should be about 1/4 inch thick.
1. Start making the hat by forming a ball of clay the size of an orange. Roll the ball out into a pancake. The clay should be about 1/4 inch thick.

2. Cut two straight edges and then a curved edge that connects the two cut edges. Bring the two straight edges together and smooth the seam to form a cone.*
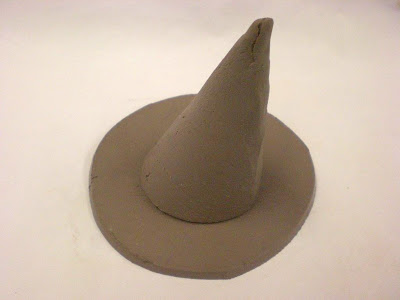 3. To make the brim of the hat, roll out another circle ¼-inch thick and place the cone in the center. Cut a circle an inch or a little larger than the base of the cone. Attach the brim to the cone by blending.*
 4. Create a band for the hat by using a scrap from the flattened pieces of clay. Wrap the strip of clay around the base of the cone where it meets the hat brim. You can decorate the hat with a buckle or just a bit of clay.
 5. For eyes, form two balls of clay whatever size you want. You can use a marker cap or a pencil to make eyeballs in the center of the eyes. Tuck the eyeballs under the brim of you witch’s hat so the eyes are peering out. Press the eyes into brim of hat so they don’t roll away!


If you want to add more to your spooky witch hat, you can form a crooked nose with a hair wart between the eyes or add a broom to the back of your witchy hat.
*If you are working with stoneware or terracotta, you will need to use the slip as glue to blend the seam of your witch’s hat and to connect the brim of your hat to the peak of the hat. Using the pencil, make scratch marks on both surfaces you will be joining. Apply the slip to the piece of clay you are adding and press the piece into place.


No comments:
Post a Comment